Valou, "A Christmas' Book-Box"

Hello everybody! 

 Today, I come to share with you my project for "Snap Dragon Snippets"!


To realize this box-pound, I used of " white Bazzil Cardstock " and papers of the new collection " Graphic45 ", "Twas the Night Before Christmas". Papers are inked to the ink "Distress Walnut Stain".


I used a rubberstamp " Crafty Sentiments ", "Christmas Helper" whom you can find HERE.

I colorized it in the following way:

- Ink "Distress Tattered Rose" and "Distress Vintage Photo" for the skin.
- Ink "Distress Antique Linen" and "Distress Brushed Corduroy" for hair.
- Ink "Distress Festive Berries".
- Ink "Distress Fayded Jeans".
- Ink "Distress Mowed Lawn".
- Ink "Distress Pumice Stone".
- Ink "Distress Spun Sugar".


Then, I added one " red Poinsettia ", a flower white "Prima", a brown rose (20 mm) (WOC) and red berries (WOC).


I also stuck a die-cut " Happy Holidays " of the same collection " Graphic45 " and a small red Christmas bauble.


On the back face of this box, I stuck a white doily. Above, I added chipboards of the same collection " Graphic45 ".


Here we are! I hope that my realization has you more and that it will inspire you.


I thank you for your passage and wish you an excellent day! Bye for now!

Hugs, 


3D Tags -- with Julie


     It's Christmas Eve, and this is Julie from Muddy Paws & Inky Fingers sharing with you today. If you're still wrapping gifts you may need a quick, but cute gift tag idea to finish the wrapping in a snap!  
  The Snapdragon Snippets Store has lots of tag ideas, but these appealed to me because I could make a few quickly.  Each would be unique, but the process would be the same.
I made 8 tags total:

Most paper is from Close To My Heart.  There is a little Echo Park Dots and Stripes, too.

I left them without ribbons or twine until I adhere them to packages or bags so I can match colors then.


The crinkle ribbon is from 3 Girl JAM. 


These 3D tags are available in the Snapdragon Snippets Store

I wish you and your a meaningful and blessed Christmas season! 


christmas tree treat box

Today I have a special treat for Christmas, I know it is in two days but this is so easy you could whip this up for the kiddos You can fill with candy or whatever you please. If you would like to get the file the no. is 35494 at the www.snapdragonsnippets.com store everything in picture except embellishment and twine be as creative as you wish. thanks for stopping by and hope everyone has a very merry Christmas.

Nativity

The reason for the season - the birth of our Lord Jesus! His humble birth in a manger is depicted in this nativity set from SnapDragon Snippets, found in their online store here. You can find all the nativity pieces in the store...Jesus, Mary, Joseph, the shepherds, wise men, an angel, plus the animals, and even the stable! It's a fantastic set; I hope you can get every piece and make your own set!

Thanks for joining me today! Merry Christmas!


Manger Shadow Box

Merry Christmas everyone!!!

Esther here with my last post before Christmas.

I thought I would share a shadow box I created as a gift for a friend of mine.

I used Snapdragon Snippets Design ID #52508 - 3d nativity box baby jesus in manger.


I created the sentiment in Silhouette Design Studio, cut it out of vinyl and attached it to the front of the glass along with a star which is also from a Silhouette file.

The hay on the bottom of the shadow box is Raffia.


I hope you have a very Merry Christmas and a Happy New Year!


Santa’s list book, gift card holder.

Hi Shary here and today I'd like to show you a fantastic way to present a gift card. It really makes a gift card look extra special. I've used a file from Snapdragon Snippets Design ID #71470  and you can find it in the Silhouette design store here.

Here's the front

And here's inside with my gift card added.


We even have a super easy to follow tutorial for you too. You can find that here.

I have used lots of Wow glitter embossing powders for the front of my box to make it really festive but you can decorate it however you want. 
I hope I've inspired you to buy the file and we'd love to see how you've used it on our Facebook page here.

Shary
x

3D Letter X Tutroial- By Valou

 Letter «   X » - Tutorial
1.Cut all the parts of your letter. Cardstock and paper printed matters. Separate, please, both to mix nothing.
2.Begin with the structure.
3.Take a stand at first the widest and the smallest "X". They go together.
4.Past in the following way.


 5.Use of double- face. It is the easiest.
6.Stick the other side on the indented part.

7.Make exactly the same thing for the lid.


3D Letter Tutorial S - by Valou

 Letter «   S » - Tutorial
1.Cut all the parts of your letter. Cardstock and paper printed matters. Separate, please, both to mix nothing.

2.Begin with the structure.
3.Take a stand at first the widest and the smallest "S". They go together.
4.Past in the following way.


5.Use of double- face. It is the easiest.

6.Stick the other side on the indented part.

7.Stick the indented part.

8.Add the second part at the other end of the "S".


9.Make exactly the same thing for the lid.


Getting Ready for Christmas! with Julie


It's Julie today. I don't know about you, but this time of year I need lots of gift bags and boxes.  It seems every time I turn around, I'm needing a little gift for something.  I created these 2 gift boxes from Snapdragon Snippets for an upcoming get together with 2 good friends.  They'll be filled with their favorite sweets!


I used the Gingerbread Gable Box, found in the Snapdragon Snippets Store.  Instead of using the gingerbread man, I used snowflakes, found here and here.  You can also find these files in the Silhouette Design Store.
I cut the files out on my Silhouette Cameo using double sided card stock by Echo Park.  You can see how it is red on one side and blue on the other.  It's great for projects like this.

These boxes are in 2 pieces, so they are quite big.  They'll fit lots of sweets!

If you are looking for gift boxes, these are great ones! They are by Chaska Card Company.  Check them out!  Then, visit this blog each day for more great inspiration from this talented design team.

3-d exploding christmas tree

Here is a fun project to make with your kids or just as a gift, you can fill with little pictures, stickers or whatever you please. I made this one for myself and enlarged 50 percent. Added cute embellishments for a festive fun tree. Just take the top off and enjoy looking at your pictures. My granddaughters made them one and added their Christmas wishes on each shape so we can look at it for fun memories. You can purchase this at the online store www.snapdragonsnippets.com #23058

Sleigh Bells Ring, Are Ya Listenin'?

Hi! This is Debb and today I'm bringing you an awesome Christmas card from the talented folks at SnapDragon Snippets. It's called "Vintage Sleigh 5 x 7 Card" and can be found here. This is such a cute card, and I can't wait to make more to send out this year! There are more cards to choose from in the "Sweet Wishes Card Kit" found in the SVG Attic store here.
If you don't have your cards finished this year, be sure and head on over to pick up this file! Listen to some Christmas music and craft away! Thanks for looking!

Christmas Cards

I can't believe we are a little more than three weeks away from celebrating Christmas!!

Do you have all your Christmas cards done?

If not, I have some cute inspiration for you!!

Esther here with some wonderful Christmas cards by Snapdragon Snippets.


First up is the most darling little Scottie dog. I used Design  #42390 - a2 card scotty dog side open card. He was super duper easy and he is so cute!!


Second up is a trio of Christmas trees. I used Design #70614 - trees trio see thru merry christmas a7 card. I think the cut out space in the middle of the trees is so fun and different!!!


Third in line is a lushious pine cone card. I love the masculine feel to this card.
I used Design #51293 - pine cone a6 card


Last up is my favorite, after all Jesus is the whole reason we celebrate Christmas!!! Little baby Jesus in the manger is so precious!!
I used Design #70615 - baby manger “the gift” shaped a7 card


I hope this gives you some inspiration for creating some fun and festive Christmas cards!!!


3D Letter "F" Tutorial

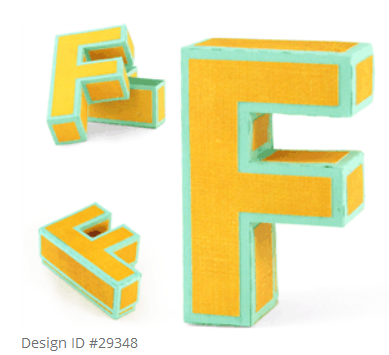
Today we have a yet another great tutorial by Christy.  This time she is sharing how to put together the 3D Letter F Box file #29348

 
1.    Cut all pieces. The image below represents the layout of the files when imported into your                  cutting program.


2.    Make note of the icons on the ends of each strip. These will be important to help you match up            the pieces in future steps.
3.       Choose your first grouping to assemble (I chose group 2, the box top). Start by placing the letter         “F” backward in front of you. Lay out your other pieces as pictured. This will help you envision        where each piece will go. I have marked the icons in red on the photo below where each icon from      the box side will meet on the box top.


4.       Crease all score lines. Use bone folder to reinforce the creases. Do a “dry fit” of each piece after creasing to ensure you are clear which side of the tab the adhesive will go on. In my photo above, the adhesive goes on the bottom of the tabs as they are pictured.
5.       Apply adhesive of choice along the length of the tabs on the side which will be adhered to the letter “F”.
6.       Beginning with one piece, begin applying the tabbed section along the letter F, ensuring the creases match up neatly in each corner as you go.


7.       Continue placing box sides in this fashion until the box top is complete.


8.       Set the box top aside. Gather the pieces from group 4, the box bottom. Lay out the letter “F”, this time facing you as it should be (not backwards as above). Again I have marked the icons in red from each side piece where they will meet with the box bottom.

9.       Begin applying the box sides one at a time, ensuring the creases meet up where the corners are on the letter “F”.


10.   Once complete fit the top and bottom together and make any adjustments if necessary. When finished, you have a completed box top and bottom. The most difficult part is over!!!

11.   Working with group 1, apply adhesive to the back of the accent paper and adhere it to each section of the top of the box. For the letter F, it is best to note the sizes of each of the squares and rectangles. I found it easiest to lay out those which seemed similar in size to ensure I was placing them properly. Note in the photo below that three of the pieces seem square and the same in size. One is more rectangular and is a little longer. The longer piece goes on the bottom leg of the F as indicated.

12.   You may find a similar exercise helpful when determining the pieces which go on the end of each “arm” or “leg” of the letter.


13.   When finished, admire your completed project!


For more tutorial on the 3D Letter Boxes see links below:
3D Box Letter A -Video
3D Box Letter B
3D Box Letter C
3D Box Letter D 
3D Box Letter E
Related Posts with Thumbnails