A break

I'm sorry I haven't been getting back to any of you. My grandmother had a stroke on Tuesday and passed away this morning. I'm having a bit of a hard time, so I may take a bit of a break. I'm going to see how I feel. Sometimes designing helps me release, but lately I haven't felt like doing anything. Thank you for all your comments and interest in my designs and blog. Hopefully I'll be back soon.

My wonderful Grandmother, Helen C. Glissmeyer
One amazing woman.

Adoption design ideas? Also, a preview of hearts.

I have so many designs I'd like to create for you. I'm thinking of doing a group of "adoption" designs if anyone is interested. I've been searching the design archives looking for adoption related designs, and there is nothing! If you are adopting or have adopted, leave your suggestions. I was adopted when I was a baby so I have a few ideas coming from the adoptee side, but not as much experience from the adoptive parent side.
As for what is coming this week, I have a collection of fun hearts to get your juices going for Valentines Day. Still a ways away, but hopefully this will give you plenty of time. They are coming in collections of 3 or 6. Here's one set:
Enjoy!

3D Folding Heart

Although it looks a little intimidating this is actually one of the easiest 3Ds to assemble.  The best part is that this 3D once assemble, can actually fold flat and be sent in an envelope.  You could write on the front or just store it as an ornament for Christmas or Valentine's.

First take the stucture pieces.  These are the two pieces that are not hearts and look different.

Next fold down all the tabs on the top and bottom of each one.  They are perforated to bend at the right places.  You will notice there are two tabs in the center that are not perforated and do not need to be folded down.


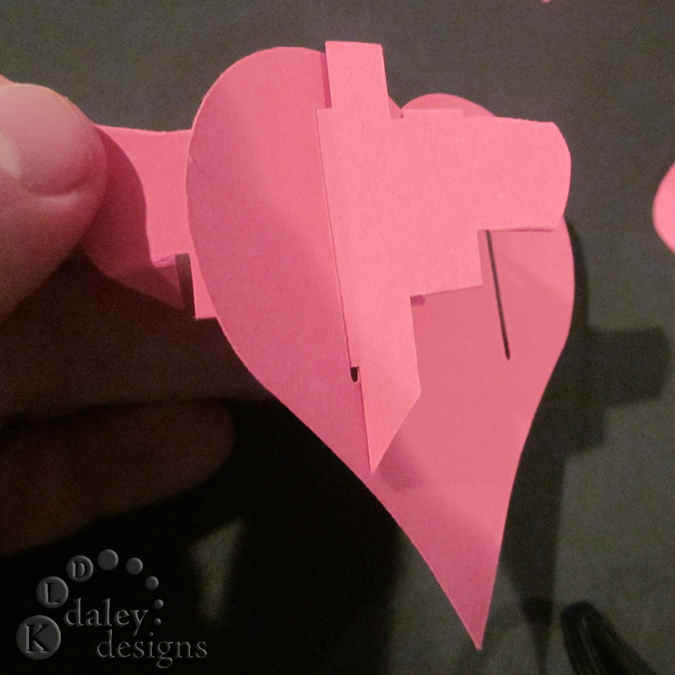
Insert the folded structure piece into the slits on the largest heart. Be sure you insert the structure piece so that large heart rests next to the two tabs that did not fold. It should be in the exact center of the structure piece. Repeat for the second structure piece.  After it is in place, fold up the tabs next to the heart to lock it in.


Take one of the middle sized hearts and insert it onto the structure pieces.  Once in place straighten those tabs to lock it in place as shown above.

Take the smallest heart and place it onto the structure pieces.  Note: if you plan to put a message on the front write it on the front piece before it is applied.  Lock it in place with the tabs.

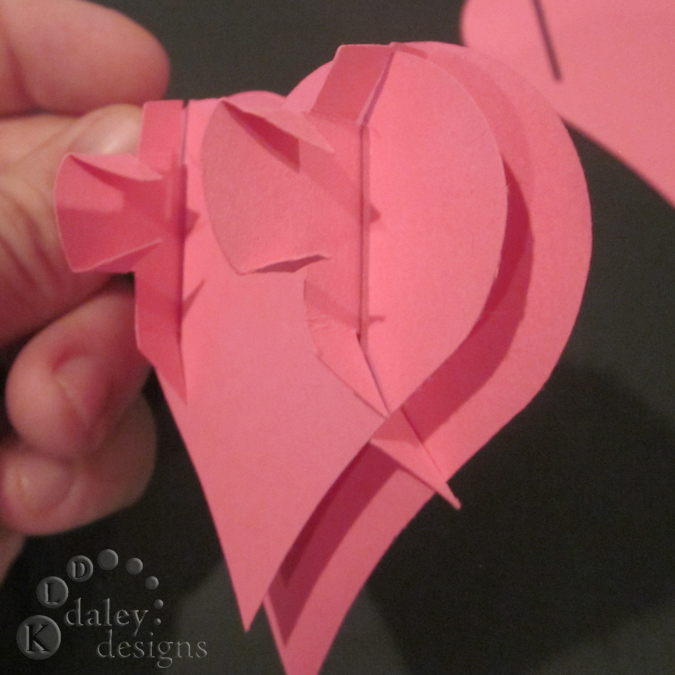
Now repeat for the back side. Apply the mid-sized heart and then the smallest heart.

Once all your pieces are in place and locked with the tabs.  Push the small heart to the side to pop it up. Pretty cool! 
 Then if you want to fold it back flat, push it back and it will collapse.

Now mail it off to that person you adore!

Enjoy!

Well, it could be...

Did you see the answer to the last post?

A 3D heart!


Well, this isn't like the other 3D designs you've seen. This can fold flat to fit in an envelope to be sent as a card or valentine. Then, it can go from flat to 3D and back again in a snap.

Working on the tutorial for this tonight which will be available tomorrow morning (12/21/2010). More in this style to come too! Keep your eyes peeled for some more fun designs! Enjoy your holidays!

Whatever could it be? Hmmm...

Did you collect all twelve of the "12 days of Christmas" ornaments and charms? Also, if you didn't see the free design from a few posts ago, be sure to grab that too! These are busy holidays, so I'm keeping the challenge open until January 5th. You have almost a month to show me what you can do with that little freebie. Submit your photo on the Daley Designs facebook page by posting to the wall. If there's good enough response, maybe we'll make the freebie flourishes a monthly or bi-weekly thing. So be sure to tell your friends! (Click here to go to the freebee post)
I have a sneak peak for you of a fun new design coming next week. Lets see if you can guess what it is.

Happy holidays!

Third day of Christmas

On the third day of Christmas, my true love gave to me, 3 French Hens:
Pick these up in the store today.
Enjoy!

Second day of Christmas

On the secon day of Christmas my true love gave to me, 2 turtle doves and a partidge in a pear tree.


Pick these up in the store today.
Enjoy!

My computer is up and running again, so here's a sneak peak of what's to come!

So if my computer hadn't crashed at the beginning of the week, you would have seen these A LOT sooner! There are a lot of fun things coming your way. If you like 3D it just gets better! Don't worry if you haven't quite caught the love of 3D designs, I have a variety of things up my sleave too. These cute little numbers are decorating our tree right now. Why spend tons on ornaments, when you can make them yourself! We've used plain cardstock on ours, but these would be beautiful in something a bit more fancy! With out further adu (think I spelled that wrong) what we've been working on all week, the ornaments:
Also, I have some new packs of faux stitching designs too. Yes, besides lying in bed sick, taking care of sick toddlers and complaining that my blasted computer keeps crashing (anyone else have that problem with HP computers?) I have actually been trying to get something accomplished. So, again, without further adu (mayber I better look up how to spell that.) here are the faux stitches coming your way:

There are 3 different sets of the faux flourishes that you can mix and match however you like. I prefer not to use the outline on the those but wanted to provide them for you incase you wanted them.

And how about some regular cuts. To go along with the faux flower above, I have a regular cut to match it plus another fun flourished flower. Some of you may be thinking "Flowers?! It's winter!" Well all we get is rain and things are green over here, plus don't flowers just make you feel warm when there's snow all around?


Be sure to get the free GSD in the previous post and submit your photos on facebook!
Enjoy!

Be featured here! What can you do with this flourish?

So, I did end up catching what my kiddos had of coarse. But I'm back. And back with your promised freebee from Facebook! Too many flourishes? Nah! You can never have too many flourishes. Oh, the possibilities! Here's the flourish freebee, now let me see what you do with it! Upload your creations to the Daley Designs facebook page, and I'll feature one lucky entry here on the blog! Now a deadline...hmmm...you have a week from tomorrow. I'll randomly pick one lucky person next Friday (the 17th) to showcase their creation here! Now get busy my friends!
I'm trying out a new "File Sharing" site. We'll see if this is less complicated and more user friendly than Metafile. Let me know if you have problems. (Click on the picture below to download file!)
Enjoy!

New Years Martini Tutorial

This is a fun little decoration for any party but I thought it might be fun for new years.  And it's alcohol free!  It can be made with or without the lime so technically there are two of the C pieces.

Optional:  If you want to add a tangy twist glue on the lime first.  Notice there is a cutout to simulate where the glass would be. 
Place C onto D and line up.


Place F onto E and line up.

Then slide CD onto EF.


Lie flat on the table to add the A ring and B disk.

Line up the groove as seen here to help in inserting the ring.

Slide A over the base and up to the slots on the upper part of the glass.

Insert A ring onto one side first
Then slide the ring onto the other side.

Place B into the base while it is still flat.

Now separate the ribs.  I find it easier often to do two at a time.  Then split it from there as shown is these pictures.  Make sure you adjust the top and the bottom symultaniously.


Now separate out the last few ribs into the remaining slots.

Now you're ready to party!

Tree Snow Globe - Oops

No good deed goes unpunished...  So I thought I'd be nice by making a two-fer (Two different tree snow globes for one) but I just ended up confusing you guys by not explaining that you can make it with just 3 trees 1 3D and two 2Ds.  Or the Forested one with a total of 1 3D and 6 2Ds.  So thats why many of you have extra pieces.  Below the Dark Blue only has the 3 trees the light blue is the 7 trees. So heres the tutorial.


Slip C onto D starting at the tree ignoring the top part of the snow globe.  Once the the trees are lined up.  Place the top of C into the top of D to line it up. 

Lay C and D flat together.  


 Then line up the tree in E with the joined CD tree.  Once together place the top of E inside of the combined CD top.


 Let CDE flat together. Bend slightly at the verticle axis so that it can go inside of ring A and B.

Place A on the top and B on the bottom (there identical so don't waste any time trying to tell them apart).  Enter all of the into one slot as seen above.   Once you get this set up you can start seperating them to their individual spots. 

Once separated the globe is done and you can set it into the base.


Here's a close up.  One other possible use.  We've placed ours on the tree as ornaments.  They look awesome.  Have fun let me know if you have any questions.
Related Posts with Thumbnails